Android with Google sign in is an important part of your app to provide a way to login to your user. Working with Google account and play service used to be a important part.

Lets get started!
Next Creating the layout and adding the custom google signin buttom
So let's scroll down to the onCreate function. And here is a to-do for us to implement the Google sign-ins object, and you can see that the GoogleApiClient is being created right below this. So let's implement that code.
To use Google sign in, you need to first set up a project on the server using Google's developer console. Go to accounts.google.com and make sure that you're signed in to your google account. And, if you don't have one, then, create one. So, I'm going to sign in to my account. Once you're signed in, go to https://developers.google.com/mobile/add. This will take you to the screen on the Google servers where you can add a project to your developer account.
So, I'm going to choose Pick a platform, and I'm gonna choose Android App. Now, I've already done this for my existing project. So, I'm just going to show you what it is that I did, and you can follow along with me. So, I can either chose an existing project or make a new one.
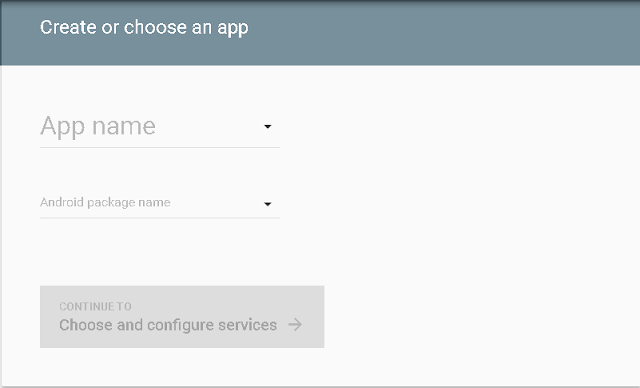

And, since I've already done this, I'm just going to create a temporary example to show you what I did. But, you can make a new project for yourself. So, I'm going to give the project a name. I'm just gonna call it google-signin.

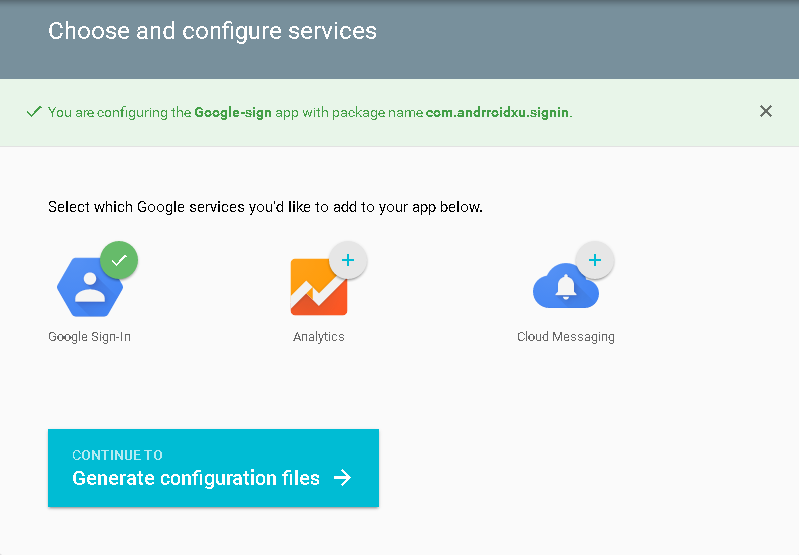
Adding the SHA 1 key
Paste the command in you terminal windows to genrate the SHA 1 key
keytool -list -v -keystore ~/.android/debug.keystore -alias androiddebugkey -storepass android -keypass androidOnce done you can download the google-services.json file and add it your app directory of your project.
So, let's go into Android studio and finish setting things up. So, in Android studio, I'm going to open the Sign in project. Alright,when it loads, what we're going to do is, in the projects explorer, we're gonna open up the build.gradle for the project Sign in. And under the classpath definition that you see here, we're going to add another one. We're going to add classpath com.google.gms:google-services.
Lets get started!
1. In Android Studio, go to File -> New Project and fill all the details required to create a new project. When it prompts to select a default activity, select Blank Activity and proceed.
Adding Dependencies
2. Open build.gradle and add android design support library com.android.support:design:23.2.1 and other dependencies.apply plugin: 'com.android.application'
android {
compileSdkVersion 23
buildToolsVersion "23.0.3"
defaultConfig {
applicationId "android.com.google_signin"
minSdkVersion 10
targetSdkVersion 23
versionCode 1
versionName "1.0"
}
buildTypes {
release {
minifyEnabled false
proguardFiles getDefaultProguardFile('proguard-android.txt'), 'proguard-rules.pro'
}
}
}
dependencies {
compile fileTree(dir: 'libs', include: ['*.jar'])
testCompile 'junit:junit:4.12'
compile 'com.android.support:appcompat-v7:23.1.1'
compile 'com.google.android.gms:play-services:8.4.0'
}
apply plugin: 'com.google.gms.google-services'
Next Creating the layout and adding the custom google signin buttom
<?xml version="1.0" encoding="utf-8"?>
<RelativeLayout xmlns:android="http://schemas.android.com/apk/res/android"
    xmlns:tools="http://schemas.android.com/tools"
    android:layout_width="match_parent"
    android:layout_height="match_parent"
    android:paddingBottom="@dimen/activity_vertical_margin"
    android:paddingLeft="@dimen/activity_horizontal_margin"
    android:paddingRight="@dimen/activity_horizontal_margin"
    android:paddingTop="@dimen/activity_vertical_margin"
    tools:context="android.com.google_signin.MainActivity">
    <TextView
        android:layout_width="wrap_content"
        android:layout_height="wrap_content"
        android:text="Status: "
        android:textSize="24sp"
        android:id="@+id/tvStatusLabel"
        android:textStyle="bold" />

    <TextView
        android:layout_width="wrap_content"
        android:layout_height="wrap_content"
        android:text="Not Connected"
        android:id="@+id/tvStatus"
        android:layout_alignParentTop="true"
        android:textSize="24sp"
        android:layout_toEndOf="@id/tvStatusLabel" />

    <TextView
        android:layout_width="wrap_content"
        android:layout_height="wrap_content"
        android:text="Display Name:"
        android:id="@+id/tvDispNameLabel"
        android:layout_below="@+id/tvStatusLabel"
        android:layout_alignParentStart="true"
        android:textStyle="bold"
        android:textSize="24sp" />

    <TextView
        android:layout_width="wrap_content"
        android:layout_height="wrap_content"
        android:text="Email: "
        android:id="@+id/tvEmailLabel"
        android:textStyle="bold"
        android:textSize="24sp"
        android:layout_below="@+id/tvDispName"
        android:layout_alignParentStart="true" />

    <TextView
        android:layout_width="wrap_content"
        android:layout_height="wrap_content"
        android:id="@+id/tvDispName"
        android:layout_alignTop="@+id/tvDispNameLabel"
        android:layout_toEndOf="@+id/tvDispNameLabel"
        android:textSize="24sp" />

    <TextView
        android:layout_width="wrap_content"
        android:layout_height="wrap_content"
        android:id="@+id/tvEmail"
        android:layout_alignTop="@+id/tvEmailLabel"
        android:layout_toEndOf="@+id/tvEmailLabel"
        android:textSize="24sp" />

    <Button
        android:layout_width="match_parent"
        android:layout_height="wrap_content"
        android:text="Disconnect"
        android:id="@+id/btnDisconnect"
        android:layout_alignParentBottom="true"
        android:layout_centerHorizontal="true" />

    <Button
        android:layout_width="match_parent"
        android:layout_height="wrap_content"
        android:text="Sign Out"
        android:id="@+id/btnSignOut"
        android:layout_above="@+id/btnDisconnect"
        android:layout_centerHorizontal="true" />

    <com.google.android.gms.common.SignInButton
        android:id="@+id/btnSignIn"
        android:layout_width="match_parent"
        android:layout_height="wrap_content"
        android:layout_above="@+id/btnSignOut"
        android:layout_centerHorizontal="true"
        android:visibility="visible" />
</RelativeLayout>
Working with MainActivity.java and Google sign in Api.So let's scroll down to the onCreate function. And here is a to-do for us to implement the Google sign-ins object, and you can see that the GoogleApiClient is being created right below this. So let's implement that code.
And in the builder we'll pass in GoogleSignInOptions.Default_Sign_In which is pretty much the only one you can pass and then we'll say .requestEmail . All right, so once we've built the Google sign-in options builder, we need to pass that to the Google API client. And to do that we use our familiar add API method.
So right after here I'll type in .addApi and pass in Auth.Google_Sign_In_API along with the Google sign-in options object that we just created, okay. So that creates the sign-in options object, passes it to the Google API client, and that allows us to use the sign-in API.
So what we're going to do is scroll up to the startSignIn function, and what we need to do now is start the sign-in process. So, to invoke the account picker that lets the user choose the account they want to sign in with, we need to create a sign in intent, and then start it. So let's write that code, I'm going to write Intent signInIntent equals Auth.GoogleSignInApi.getSignInIntent. I'm going to pass in the mGoogleApiClient that I've created and then I'm gonna call startActivityForResult with my signInIntent, and a code, and you can see that I've defined a constant up here to indicate that the activity I'm starting for result is the sign-in process, and we'll use that later when the activity result handler is called.
So I'll type Res_Code_Sign_In. All right, so when the user selects the account to sign in with, that's going to cause the onActivityResult function to be called, and onActivityResult is down here. So when this function is called, we're going to check to make sure that what they're doing is the sign-in process and the code is going to extract the GoogleSignInResult and it's going to pass that to a function called the signInResultHandler. So it gets the GoogleSignInResult by calling the getSignInResultFromIntent, which is this intent that's passed in from the end of the process.
So let's go take a look at the signInResultHandler and the signInResultHandler is up here. So this function checks to see if sign-in was successful by calling the result.isSuccess function.And if so, it extracts information such as the user's Display Name, the user's email, and sets those values into the text fields in our layout.
Copy and paste the code to Mainactivity.java
Run the App
Adding the MainActivty Code
Copy and paste the code to Mainactivity.java
package android.com.google_signin;

import android.content.Intent;
import android.support.v7.app.AppCompatActivity;
import android.os.Bundle;
import android.util.Log;
import android.view.View;
import android.widget.TextView;

import com.google.android.gms.auth.api.Auth;
import com.google.android.gms.auth.api.signin.GoogleSignInAccount;
import com.google.android.gms.auth.api.signin.GoogleSignInOptions;
import com.google.android.gms.auth.api.signin.GoogleSignInResult;
import com.google.android.gms.auth.api.signin.GoogleSignInStatusCodes;
import com.google.android.gms.common.ConnectionResult;
import com.google.android.gms.common.Scopes;
import com.google.android.gms.common.SignInButton;
import com.google.android.gms.common.api.GoogleApiClient;
import com.google.android.gms.common.api.ResultCallback;
import com.google.android.gms.common.api.Scope;
import com.google.android.gms.common.api.Status;

public class MainActivity extends AppCompatActivity implements
        GoogleApiClient.OnConnectionFailedListener,
        View.OnClickListener {

    private static final String TAG = "SIGNIN_EXERCISE";
    private static final int RES_CODE_SIGN_IN = 1001;

    private GoogleApiClient mGoogleApiClient;

    private TextView m_tvStatus;
    private TextView m_tvDispName;
    private TextView m_tvEmail;

    private void startSignIn() {
        // TODO: Create sign-in intent and begin auth flow
        Intent signInIntent = Auth.GoogleSignInApi.getSignInIntent(mGoogleApiClient);
        startActivityForResult(signInIntent, RES_CODE_SIGN_IN);
    }

    private void signOut() {
        // TODO: Sign the user out and update the UI
        Auth.GoogleSignInApi.signOut(mGoogleApiClient).setResultCallback(
                new ResultCallback() {
                    @Override
                    public void onResult(Status status) {
                        m_tvStatus.setText(R.string.status_notsignedin);
                        m_tvEmail.setText("");
                        m_tvDispName.setText("");
                    }
                });
    }

    private void disconnect() {
        // TODO: Disconnect this account completely and update UI
        Auth.GoogleSignInApi.revokeAccess(mGoogleApiClient).setResultCallback(
                new ResultCallback() {
                    @Override
                    public void onResult(Status status) {
                        m_tvStatus.setText(R.string.status_notconnected);
                        m_tvEmail.setText("");
                        m_tvDispName.setText("");
                    }
                });
    }

    private void signInResultHandler(GoogleSignInResult result) {
        Log.d("result=", String.valueOf(result));
        if (result.isSuccess()) {
            GoogleSignInAccount acct = result.getSignInAccount();
            m_tvStatus.setText(R.string.status_signedin);
            try {
                Log.i("Signin",acct.getDisplayName());
                m_tvDispName.setText(acct.getDisplayName());
                m_tvEmail.setText(acct.getEmail());
            }
            catch (NullPointerException e) {
                Log.d(TAG, "Error retrieving some account information");
            }
        }
        else {
            Status status = result.getStatus();
            int statusCode = status.getStatusCode();
            Log.d("StatusCode", String.valueOf(statusCode));
            if (statusCode == GoogleSignInStatusCodes.SIGN_IN_CANCELLED) {
                m_tvStatus.setText(R.string.status_signincancelled);
            }
            else if (statusCode == GoogleSignInStatusCodes.SIGN_IN_FAILED) {
                m_tvStatus.setText(R.string.status_signinfail);
            }
            else {
                m_tvStatus.setText(R.string.status_nullresult);
            }
        }
    }

    // *************************************************
    // -------- ANDROID ACTIVITY LIFECYCLE METHODS
    // *************************************************
    @Override
    protected void onCreate(Bundle savedInstanceState) {
        super.onCreate(savedInstanceState);
        setContentView(R.layout.activity_main);

        m_tvStatus = (TextView)findViewById(R.id.tvStatus);
        m_tvDispName = (TextView)findViewById(R.id.tvDispName);
        m_tvEmail = (TextView)findViewById(R.id.tvEmail);

        findViewById(R.id.btnSignIn).setOnClickListener(this);
        findViewById(R.id.btnSignOut).setOnClickListener(this);
        findViewById(R.id.btnDisconnect).setOnClickListener(this);

        // TODO: Create a sign-in options object
        GoogleSignInOptions gso = new GoogleSignInOptions
                .Builder(GoogleSignInOptions.DEFAULT_SIGN_IN)
                .requestEmail()
                .requestScopes(new Scope(Scopes.PLUS_LOGIN))
                .build();

        // Build the GoogleApiClient object
        mGoogleApiClient = new GoogleApiClient.Builder(this)
                .enableAutoManage(this, this)
                .addApi(Auth.GOOGLE_SIGN_IN_API, gso)
                .build();

        // TODO: Customize the sign in button
        SignInButton signInButton = (SignInButton) findViewById(R.id.btnSignIn);
        signInButton.setSize(SignInButton.SIZE_WIDE);
        signInButton.setColorScheme(SignInButton.COLOR_DARK);
        signInButton.setScopes(gso.getScopeArray());
    }

    @Override
    protected void onStart() {
        super.onStart();
    }

    @Override
    public void onActivityResult(int requestCode, int resultCode, Intent data) {
        super.onActivityResult(requestCode,resultCode,data);

        if (requestCode == RES_CODE_SIGN_IN) {
            GoogleSignInResult result = Auth.GoogleSignInApi.getSignInResultFromIntent(data);
            signInResultHandler(result);
        }
    }

    // *************************************************
    // -------- GOOGLE PLAY SERVICES METHODS
    // *************************************************
    @Override
    public void onConnectionFailed(ConnectionResult connectionResult) {
        Log.d(TAG, "Could not connect to Google Play Services");
    }

    // *************************************************
    // -------- CLICK LISTENER FOR THE ACTIVITY
    // *************************************************
    @Override
    public void onClick(View v) {
        switch (v.getId()) {
            case R.id.btnSignIn:
                startSignIn();
                break;
            case R.id.btnSignOut:
                signOut();
                break;
            case R.id.btnDisconnect:
                disconnect();
                break;
        }
    }
}


